|
The ViziFrame
Windows Client is included free of charge with every system. It
allows you to easily manage one or hundreds of ViziFrames over a
LAN, WAN, VPN, or Internet. You can use it to build playlists
that combine stored local content and dynamic network based
content all in a single presentation.
The ViziFrame
Client application runs on most Microsoft Windows based PCs,
including Windows ME, 2000, 200 Server, XP Home and Pro, plus
Vista and its multitude of flavors. The application allows the
user to create Static and Dynamic Playlists and transmit them to
any number of ViziFrame Servers via FTP. The client application
initially shows four panes in a single window, as shown below.
The left pane
is a tree view listing the current drives in the local machine.
If a favorites folder has been set in your PC, then this tree
list will display the contents of that folder, otherwise it will
display the available drives.
Note that you
can change the size of the panes by dragging the borders if you
wish.
The user may
select a file from this left hand tree list and add it to the
play list as a local file. When you do that, the image selected
will appear as shown below:
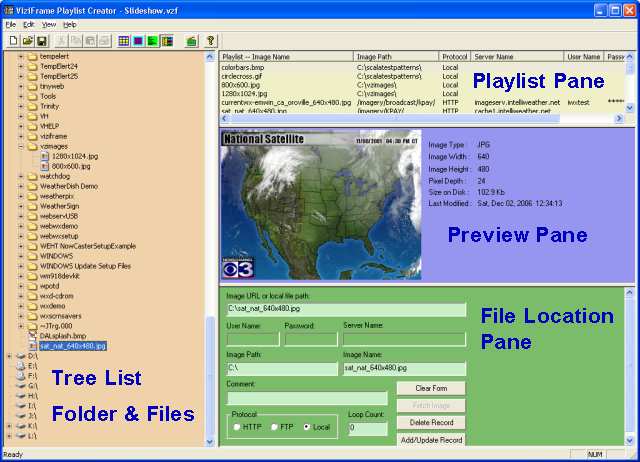
The right
pane is split into three sub-panes.
The top
sub-pane displays the Play List. The list is displayed in
ascending order. That is, the top item in the list is the first
image that will be displayed in the slide show.
The list consists of seven columns of data.
-
The Image
Name column contains the file name of the image to be
displayed.
-
The Image
Path column displays where the file is located on the server.
-
The
Protocol column displays how the file will be retrieved from
the server.
-
The Server
Name column displays the server name.
-
The User
Name column displays the authenticated user name for the
server.
-
The
Password column displays a hidden password.
-
The Loop
Count column shows how many images are in the loop set.
To add an
item to the list, fill out the fields in the bottom pane and
press the Add/Update button (see below). The item will be added
to the list immediately below the current selection, or at the
bottom of the list if no item is currently selected.
To delete an
item, highlight the item and press the Delete Record button in
the bottom pane. The user will be prompted to confirm the
deletion.
To move an
item or change the order of the items, select an item and press
the Move Up or Move Down arrows in the toolbar, or by
right-click on the item and select Move Up or Move Down from the
context menu.
The middle
Preview Pane displays a thumbnail version of the currently
selected image.
The user may
display images by selecting them in the tree control, or by
highlighting an item in the play list. In the latter case, the
image is only displayed if it has previously been retrieved from
the server (see Fetch Image below). Some image data is also
displayed. That data includes the image type (BMP, JPG, GIF, or
PNG), the image width and height on screen, the pixel depth of
the image, the size of the image file on the hard drive, and the
date and time that the file was last modified.
The bottom
pane displays controls where the user may enter image data.
Publishing
a Play List to a remote ViziFrame Server
The user may transmit either and/or
both of these play list files to the server (along with any required local
content) at any time. To publish a Static play list, select the Publish Static
Playlist menu item from the File… menu. To publish a Dynamic play list, either
select the Publish Playlist menu item from the File… menu,
or press the Publish
button
 on the Toolbar. on the Toolbar.
The program will display a
communications dialog where the user enters the server name (if you established
a DNS entry for the machine, such as viziframe1.mydomain.com) or IP
address of the ViziFrame Server, and a user name and password to access the
ViziFrame Server’s FTP service. The FTP service uses standard FTP on ports 20
and 21. If your firewall is set to block FTP transfers, it will need to be
opened for these ports.
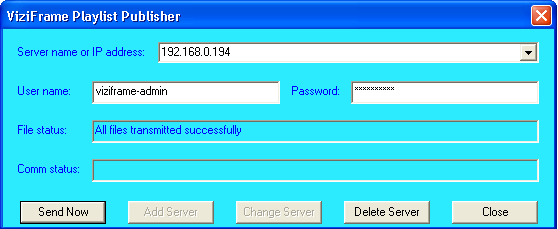
The
default factory supplied ViziFrame Server username and password will
automatically fill in, all you need to do is supply the IP address where the
ViziFrame exists on your network.
If you have only one or more than one
ViziFrame Server on your network, you can do a "Add Server" after you have typed
in the connection and login details correctly for each server. You will then be
able to select the server from the drop down list later to enable quicker
publishing.
When a successful connection is made to the
ViziFrame Server, the program will
transmit the play list and any local content to the appropriate directories on
the ViziFrame Server. You will be able to see a message that says "All files
transmitted successfully".
Note: The ViziFrame Server may take up to 60 seconds to load the new show
after it has been received from the ViziFrame client. It depends on when the
new show was received in relation to the internal checking done by the ViziFrame
Server. On some occasions your show may update almost immediately, at other
times it may take longer. This is normal.
|